
Looking to take your outdoor entertainment to the next level? With a DIY outdoor TV enclosure, you can enjoy your favorite shows and movies al fresco, right in your own backyard.
In this article, we’ll guide you through the process of choosing the right TV, gathering materials, building the enclosure, and more.
Get ready to create the ultimate outdoor entertainment setup and make your backyard the go-to spot for movie nights and game days.
Choosing the Right TV for Outdoor Use
When choosing a TV for outdoor use, consider the durability and weather resistance of the television. Outdoor TVs are specifically designed to withstand the harsh elements such as rain, snow, and extreme temperatures.
Look for a television that’s IP-rated, meaning it has a high level of protection against water and dust. Additionally, opt for a TV with a sturdy construction and materials that can withstand outdoor conditions. A good choice would be a television with a weatherproof casing and a screen made of tempered glass to resist damage.
It’s also important to choose a TV with a bright display to combat glare from the sun. By considering these factors, you can ensure that your outdoor TV will be able to withstand the elements and provide you with years of entertainment.
Gathering the Necessary Materials and Tools
To begin your DIY outdoor TV enclosure project, first gather the necessary materials and tools. You’ll need:
- A waterproof TV enclosure, which you can purchase online or at a local home improvement store. Make sure it’s compatible with your TV size and has built-in ventilation to prevent overheating.
- A TV mount that’s suitable for outdoor use and can withstand different weather conditions.
- Other materials required include weatherproof silicone sealant, stainless steel screws, and a screwdriver.
- To protect your TV from dust and moisture, consider using a TV cover or plastic wrap.
- Lastly, don’t forget safety gear like gloves and goggles to protect yourself during the installation process.
Planning the Design and Measurements
Start by considering the layout and dimensions of your outdoor space for the design and measurements of your DIY outdoor TV enclosure. Take a walk around your yard and identify the ideal location for your television. Consider factors such as sunlight exposure, viewing angles, and distance from seating areas.
Measure the available space and make note of any obstacles or potential challenges that may affect the placement of your enclosure. This will help you determine the size and shape of your enclosure. Additionally, consider the materials you plan to use and their dimensions when calculating the overall size of your project.
Remember to leave enough space for ventilation and accessibility to the back of the TV for maintenance. Accurate planning and measurements will ensure a successful and functional outdoor TV enclosure.
Building the Frame for the TV Enclosure
First, gather the necessary materials and tools for building the frame of your DIY outdoor TV enclosure. You’ll need pressure-treated lumber, measuring tape, a saw, a drill, screws, corner brackets, and a level.
Start by measuring and cutting the lumber according to the dimensions of your TV. Remember to leave enough space for ventilation and access to the back of the TV.
Once the lumber is cut, assemble the frame by attaching the pieces together using screws and corner brackets for added stability. Make sure the frame is square by using a level.
Adding Ventilation and Cooling Systems
Once the frame is complete, it’s important to incorporate proper ventilation and cooling systems into your DIY outdoor TV enclosure.
Without these systems, your TV may overheat and become damaged.
To ensure proper ventilation, consider adding vents or fans to the enclosure.
Vents can be installed on the sides or top of the enclosure to allow hot air to escape.
Fans can also be used to actively circulate air and prevent heat buildup.
Additionally, you can use a cooling system such as an air conditioner or a cooling gel pad to regulate the temperature inside the enclosure.
Installing the Outdoor TV Mount
To begin, attach the outdoor TV mount securely to the frame of your DIY outdoor TV enclosure. Make sure the mount is positioned in a way that allows the TV to be easily viewed from your desired seating area.
Use screws or bolts to fasten the mount to the frame, ensuring that it’s stable and can support the weight of the TV. Double-check that the mount is level and aligned properly before tightening the screws or bolts completely.
It’s important to follow the manufacturer’s instructions for installing the mount to ensure a secure and stable attachment.
Waterproofing the Enclosure
To ensure maximum protection from water damage, regularly apply a waterproof sealant to the exterior of your DIY outdoor TV enclosure. This step is crucial in keeping your TV safe and functioning properly, especially in outdoor environments where it may be exposed to rain, snow, or other forms of moisture.
Waterproof sealants create a barrier that prevents water from seeping into the enclosure and causing damage to the electronic components inside. When applying the sealant, make sure to cover all the surfaces of the enclosure, paying extra attention to any gaps or seams where water could potentially enter.
Additionally, it’s important to reapply the sealant periodically, as it may wear off over time due to exposure to the elements.
Wiring and Connecting the TV
To properly wire and connect your TV in the DIY outdoor TV enclosure, you’ll need to follow these steps.
First, make sure your TV has the necessary ports for connecting external devices. Most modern TVs have HDMI, USB, and audio ports.
Next, determine the ideal location for the TV inside the enclosure, ensuring that the wiring can reach the power source and any other devices you plan to connect.
Use high-quality, weatherproof cables to connect the TV to the power source and any other devices, such as a cable box or streaming device. Secure the cables to the enclosure using cable clips or ties to prevent them from getting tangled or damaged.
Testing and Adjusting the TV Setup
Ensure that you thoroughly test and make necessary adjustments to your TV setup for optimal outdoor entertainment.
Start by checking the picture quality and sound to ensure they meet your expectations. Adjust the brightness, contrast, and color settings to achieve the desired visual display.
Experiment with different sound settings to find the right balance for outdoor viewing.
Test the remote control to ensure it works properly from various distances and angles.
Consider adding an outdoor speaker system for enhanced audio performance.
Check the TV’s compatibility with different media devices, such as streaming devices or gaming consoles.
Finally, test the TV’s durability by exposing it to various weather conditions and ensure that it remains functional.
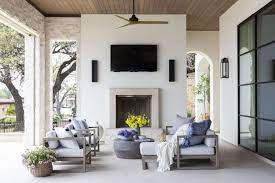
Enhancing Your Outdoor Entertainment Experience
Maximize your outdoor entertainment experience by incorporating additional features and accessories into your DIY outdoor TV enclosure.
While the TV enclosure itself provides protection for your television, there are various ways to enhance your overall viewing experience. Consider installing outdoor speakers to create a surround sound system, immersing yourself in high-quality audio.
Adding a weatherproof soundbar is another option, providing a sleek and compact solution for improved sound.
Don’t forget about seating! Invest in comfortable outdoor furniture or create a cozy seating area with cushions and pillows.
To combat glare, install an anti-glare film on your TV screen or consider a tilting mount to adjust the viewing angle.
Lastly, incorporating lighting options, such as string lights or LED strips, can add ambiance and make your outdoor entertainment space even more inviting.
Frequently Asked Questions
How Do I Protect My Outdoor TV Enclosure From Extreme Weather Conditions?
To protect your outdoor TV enclosure from extreme weather conditions, make sure it is properly sealed and waterproofed. Use a weather-resistant cover when not in use and consider adding a fan or heater for temperature regulation.
What Kind of Maintenance Is Required for an Outdoor TV Enclosure?
To maintain your outdoor TV enclosure, regularly clean it with a soft cloth and mild detergent. Check for any loose screws or damage and make necessary repairs. Keep it covered when not in use to protect it from the elements.
Can I Use My Regular Indoor TV for Outdoor Use?
Yes, you can use your regular indoor TV for outdoor use, but it may not withstand the elements as well as a TV specifically designed for outdoor use. Consider an outdoor TV enclosure for added protection.
How Do I Prevent Bugs and Insects From Getting Inside the TV Enclosure?
To prevent bugs and insects from getting inside your TV enclosure, make sure to seal any gaps or openings with weatherstripping or silicone caulk. Regularly clean the area around the enclosure to discourage pests.
Is It Safe to Leave My Outdoor TV Enclosure Unattended During the Night?
Yes, it’s safe to leave your outdoor TV enclosure unattended during the night. Make sure it’s securely locked and protected from the elements. Enjoy your entertainment al fresco!
Conclusion
In conclusion, building a DIY outdoor TV enclosure can be a fun and rewarding project that enhances your outdoor entertainment experience.
By choosing the right TV, gathering the necessary materials and tools, planning the design, and adding ventilation and waterproofing, you can create a functional and durable enclosure.
Don’t forget to test and adjust the TV setup to ensure optimal performance.
So grab some popcorn, sit back, and enjoy your favorite shows and movies al fresco!